前言:proxy server是快取伺服器通常是用來加速web server網頁瀏覽的最佳化的方式,也可以拿來作反向代理服務器
CDN的全稱是Content Delivery Network,即內容轉發。其目的是通過在現有的Internet中增加一層新的網路架構,將網站的內容發佈到最接近用戶的網絡"邊緣",使用戶可以就近取得所需的內容,解決Internet網絡擁擠的狀況,提高用戶訪問網站的回應速度。從技術上全面解決由於網路頻寬小、用戶訪問量大、網點分佈不均等原因所造成的用戶訪問網站響應速度慢的問題。
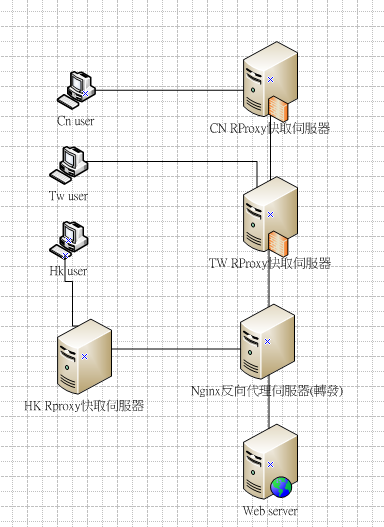
不同地區的使用者可以取用當地最快的proxy server加速瀏覽網頁可搭配智能DNS,示意圖如下:
測試環境
rproxy伺服器ip 192.168.1.28
web server ip 192.168.1.7
安裝版本:easy-cdn-1.0.5-linux.tar.gz
檔案下載:https://www.itnotetk.com/phpbb/viewtopic.php?f=15&t=545&p=553#p553
需要安裝gcc才能進行後續安裝
解壓縮檔案
tar xvf cdn.tar
cd /cdn
cd /cd easy-cdn-1.0.5-linux/
cd easy-cdn-1.0.5-linux-squid/
執行./autocdn 安裝時都只需按enter用預設安裝即可最後按空白鍵他就會自已跑安裝
預設安裝目錄是在/usr/local/
預設cache目錄是在/cache
預設信箱是[email protected]
Default name:easy-cdn.cn
======
AutoCDN-squid v 1.0.5 for Linux  Written by badb0y
=========================================================================

A tool to auto-compile & install Squid on Linux from sources
For more information please visit http://code.google.com/p/easy-cdn

=========================================================================
Please input Squid path install to::
(Default Path: /usr/local):
Please input cache_dir path to:
(Default Path: /cache):
Please input cache_mgr name:
(Default name: [email protected]):
Please input dns_name name:
(Default name: .easy-cdn.cn):
Please input domain_name name:
(Default name: www.easy-cdn.cn):
Please input ip_ad:
(Default Path: 192.168.100.237):
Please input visible_hostname:
(Default Path: easy-cdn_node1):
==================squid_path==================

squid_path=/usr/local/squid
squid_cache=/cache
[email protected]
dns_name=.easy-cdn.cn
domain_name=www.easy-cdn.cn
ip_ad=192.168.100.237
visible_hostname=easy-cdn_node1

==================squid_path==================
If the error, ctrl + c end

If the OK! Press any key to start...
開始編譯程式時間會有點久,先放著讓它跑
安裝完畢會顯示以下訊息
2013/06/22 00:22:32| Creating Swap Directories
=========================================================================
The path of some dirs:
squid dir :/usr/local/squid
Cache dir :/cache

The path of some files:

Easy-CDN run script:/usr/local/squid/squidrun.sh
Auto add domain tools:/usr/local/squid/sbin/autodomain
More tools dir:/usr/local/squid/sbin/

   Thank you for your use and support of Easy-CDN
   Web:http://code.google.com/p/east-cdn
   Msn:[email protected]

=========================================================================
檢查cache目錄底下是否有檔案產生

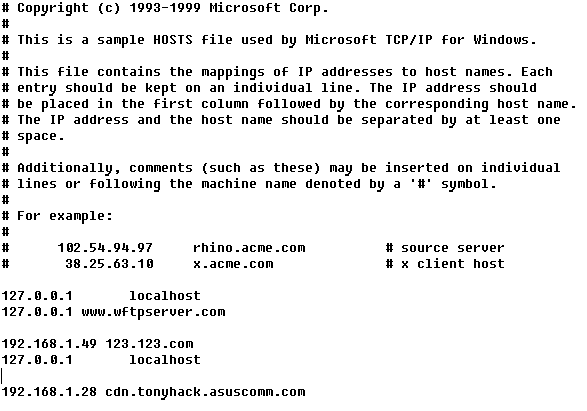
squid基本參數設定檔案都是在下面的路徑 ps.config檔案裡面不能用#來註解請注意
cd //usr/local/squid/etc
會改到三個檔案
vi ./dns.txt
.cdn.tonyhack.asuscomm.com
vi ./host.conf
192.168.1.7 cdn.tonyhack.asuscomm.com
vi ./dstip.conf
192.168.1.7
基本上設定完畢就可以啟動了
cd /usr/local/squid
./squidrun.sh
使用以下指令查看服務是否啟動
netstat -tlnup | grep 80
tcp 0 0 0.0.0.0:80 0.0.0.0:* LISTEN 14457/(squid)
windows 本機host驗證方式
修改 C:\Windows\System32\drivers\etc
加入192.168.1.28 cdn.tonyhack.asuscomm.com
C:\Users\tony>ipconfig /flushdns
測試host是否有修改到
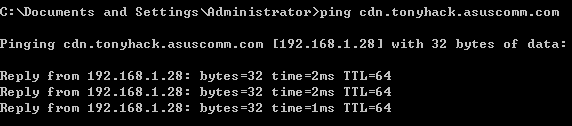
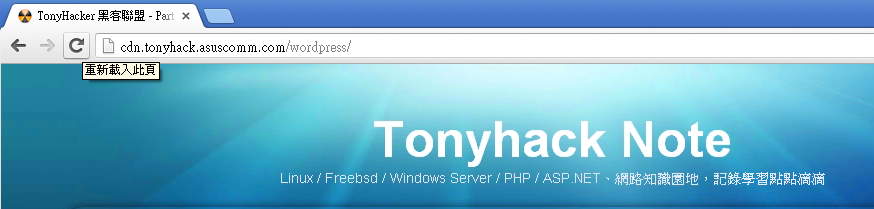
開啟瀏覽器打http://cdn.tonyhack.asuscomm.com 測試有頁面就代理成功了
Squid細部的設定檔在
cd/usr/local/squid/etc/squid.conf
=====================================================================
squid.conf -- 初級篇
=====================================================================
 在這個初級篇中,只是要提醒幾個設定重點,只要把這個設定好了,你就可以啟動
squid了.當然這只是squid的一部分而已,要做最佳化那就有得努力了.
 先寫在前面,若在各選項中,若某一設定行前面有 " # ",那代表這是預設值.也就
是說除非uncomment及更動內容, 否則squid在啟動時會以此來預設值來準.
 1. 瀏覽器連接proxy時,所使用的port.
  #http_port 3128
  http_port 8080
 2. sibling連接本proxy時,所使用的port.
  #icp_port 3130
  icp_port 3130
 3. 設定local_domain & local_ip:目的在於欲連線的server若在此範圍內的,就不透
   過sibling或parent.(請配合stoplist使用,可減少硬碟使用空間)
   # local_domain my.domain
  local_domain ym.edu.tw
   #local_ip IP/netmask
  local_ip 140.129.51.0/255.255.255.0
  local_ip 140.129.52.0/255.255.248.0
  local_ip 140.129.64.0/255.255.240.0
  local_ip 140.129.80.0/255.255.255.0
 4. 設定squid可利用多少記憶體來cache 資料在mem中.如果是新手,我會建議將此值
   設為通常是實體記憶體的1/3.
    如現在我有64MB RAM,我就設為20M.這個只是用來cache data, squid為了要正常
   運作,通常會在多吃些記憶體,以我現在的/cache中有600MB,squid大概吃了31M,
   所以請將此值設為實體記憶體的1/3,否則可能會使得squid可能會因為要不到多的
   記憶體而一直掛點,然後又重新啟動,甚至當機.
  #cache_mem  8
  cache_mem 20
 5. /usr/local/squid/cache可以有多大,也就是指可以在硬碟中存放多少MB的東西.
   在此,我把它改為1024MB,也就是1GB.
  #cache_swap 100
  cache_swap 1024
 6. 這個log 檔通常沒用,可以不要它.請在目錄位置改為none.
  #cache_store_log /usr/local/squid/logs/store.log
  cache_store_log none
 7. 資料保存多久.在此為一筆已在cache中的資料,若一個禮拜內沒人再來access,
   則這筆資料會被清掉
  #reference_age 1 year
  reference_age 7 days
 8. 當squid掛點後,要mail給squid.
  #cache_mgr webmaster
  cache_mgr squid
 9. 若由root來啟動squid,那要變成誰的身分來執行.
  #                     UID      GID
  #cache_effective_user nobody nogroup
  cache_effective_user squid squid
 10. Stoplist:
  1) hierarchy_stoplist
      如果在URL中出現以下的字樣,則本機proxy不會向parent or sibling做查詢,
      而是直接處理.(預設值為cgi-bin 及 ? ;在下面的例子,多加了個cgi)
      #hierarchy_stoplist cgi-bin ?
      hierarchy_stoplist cgi-bin ?  cgi
  2) cache_stoplist
      用途在於,如果在URL中含有以下的字元,則不將它留在cache中,而是立即清掉.
      除了可以濾掉一些不想存在硬碟中的垃圾外,我們還是也可以利用這個以確保
      我們所在網域的其它主機檔案不會留在proxy server中.
      (在下面的例子中,我將陽明大學的domain及可能的IP address列為stoploist)
        #cache_stoplist cgi-bin ?
        cache_stoplist cgi-bin ? cgi
        cache_stoplist ym.edu.tw
        cache_stoplist 140.129.51 140.129.6 140.129.7 140.129.80
 ==================================================================
squid.conf -- Cache Hierarchies
==================================================================
 說文解字: hierarchy :階級的意思!!
 Cache hierarchies也就是說把proxy server搞出一個階級制度.怎麼說呢??
                         Parent
                       /    |
                     /      |
                sibling -- machine A
                   |         |
                   |         |
                Browser   Browser
 以上是個簡圖,這只是階級構造中的一小部分而已,可以由它再去組成廣大的網狀圖.
 1) 當machine A 收到 browser的要求時,它會檢視自己的cache中是否有browser所
   要的檔案,如果有且是"品質優良"的,則machine A會直接把這個檔案送回給browser.
   若在machine A的cache中沒有這個檔或這個檔已經過期,那它會送出含有URL的UDP
   封包給它的silbling & parent.
 2) 當machine A的sibling收到這個封包後,它也會去檢視它自己有無這個檔,若有則
   向machine A回說: "我有!你過來抓吧!!" 若沒有,他就會說: " Sorry, I can't
   help you!"
 3) 同樣的,parent到目前為止所做的事跟sibling一模一樣.
 4) 若所要的檔案有人回應該說,"我有!" 那machine A會在收到通知後,立刻去那裏抓檔.
   但如果在一定的時間內(預設值是2 sec),沒人回說"我有!",那machine A這時怎麼辦
   呢??? Machine A它會去找出剛剛是哪一個parent最早回"我沒有",於是就請它幫忙
   抓檔回來.
 5) 看到沒,我開始點出parent跟sibling的不一樣了.parent的意思就是,你在親朋好友間
   得不到協助,那你跟我說,我就去幫抓檔.於是parent開始重複machine A做過的事,
   check silbing & parent有沒有資料,有就抓回來給machine A,沒有的話,看是要自己
   去抓或者是再透過parent.
 6) 看了第五點,你應該就會知道在階層中設太多的層,或多層間上下相互query,其實說不
   定不會省下頻寬,反而可能會加重主機及網路的負擔.所以正確地設定parent &
   sibling很重要,不要一拿到全部proxy server列表就全部都設上去.這是很危險的.
 >--------------------------------------------------------------------------<
 #cache_host hostname type 3128 3130
cache_host     140.111.1.52              parent 3128 3130 [default][no-query]
cache_host     proxy.ee.ntu.edu.tw       sibling 3128 3130 [proxy-only]
cache_host     proxy.ncu.edu.tw          sibling 3128 3130
cache_host     proxy.csie.ncu.edu.tw     sibling 8080 3130
cache_host     proxyftp.csie.ncu.edu.tw  sibling 3128 3130
cache_host     140.111.1.2               sibling 3128 3130
 這是一般設定方法.在parent的後面可以接一些參數,詳請請見squid.conf說明,不過會用
到的機會不多.而sibling後面可以接proxy-only,這代表東西取回來後,不存下來,這樣
可以省下硬碟空間.但除非你的硬碟太少或者是與對方網路夠快,否則沒有必要這樣設.
 cache_host_domain 140.111.1.52 !.tw !hinet.net
cache_host_domain 140.129.56.251 .tw
 這是是用來規範那些domain的資料要跟誰問,或者不跟誰問.
像cache_host_domain 140.111.1.52 !.tw !hinet.net代表只要是.tw or hinet.net結
尾的,就不向140.111.1.52這台主機查詢.
 ==================================================================
squid.conf -- Access controls
==================================================================
 Access control,顧名思義,就是要控制連線.這裡的學問也不小,我先就幾個比較重要的
來解釋,其餘的部分希望有人可以幫忙補充,或者過幾天我再post.
 我個人"私自"把這個部分拆成兩個部分,一個是"定義群組",另一則為 "access rule".(
名字自己取的).
 1) 定義群組:
     在squid.conf中,已經有幾個預先建立的群組.我們先來看看.
     #acl aclname acltype  string/file
     ------------------------------------------------
     acl manager proto cache_object
     acl localhost src 127.0.0.1/255.255.255.255
     acl all src 0.0.0.0/0.0.0.0
      acl SSL_ports port 443 563
     acl Dangerous_ports port 7 9 19
     acl CONNECT method CONNECT
     ----------------------------------------------------
    常用的是只有前三個.後三者,請不要移除!
    在定rule時,以acl 關鍵字起始.第二欄就自己取個好記的名字,第三欄
    是你要定義的東西是什麼的項目.第四欄就是就依第三欄而變,如果第三
    欄是port的話,就在此打port;如果是src的話,就打ip/netmask.
    以我的設定檔為例,我就多加了五個定義項目.
         acl hint src 140.129.51.0/255.255.255.0
        acl school src 140.129.52.0/255.255.252.0
        acl dorm src 140.129.56.0/255.255.248.0
        acl teaching src 140.129.64.0/255.255.240.0
        acl dialup src 140.129.80.0/255.255.255.0
 2) Access rule:
     以下為預設rule:
     -------------------------------------------------------------------------
     # Only allow access to the cache manager functions from the local host.
     http_access deny manager !localhost
     http_access deny CONNECT !SSL_ports
     http_access deny Dangerous_ports
     # Allow everything else
     http_access allow  all
     # Reply to all ICP queries we receive
     icp_access  allow  all
    --------------------------------------------------------------------------
    這些rules的比對,是從上而下的,先對的,先贏!!舉個例子來說,你想擋掉所有的http
    access,要怎麼寫呢???
   (A) http_access allow all
      http_access deny all
  (B) http_access deny all
      http_access allow all
     答案是(B),因為若設為A,那所有連線在第一個rule時都被允許通過了,哪輪到第二個
    rule來對呢!
   這個東西都常被拿來用的地方是,你的proxy server開放給誰做http_access,如只有校
  內.像我們這個爛學校,拿台IDE HD的電腦叫我架proxy,我只好忍痛把icp_access全部
  拿掉.以下是我的部分設定檔.
    # Allow everything else
   #http_access allow  all
   http_access deny all !hint !school !dorm !dialup !teaching
   #hint, school,dorm,dialup.teaching,已經在第一點中就定義了,別忘了!!
   # Reply to all ICP queries we receive
   icp_access  deny  all
 固定的是 DS、OS & NO,
L1 & L2 指的是第一層、第二層目錄,則是未知數
DS 指的是 disk space, OS 指的是平均每個檔案的大小
而 NO 指的是一個目錄內的檔案數量.
 寫成 L1*L2*OS*NO=DS 會比較容易懂一點...
最好是留多一點,這樣臨時如果加大 space 的話才不需要再額外調整目錄的數量.
 ------------------------------------------------------------------------------
 Proxy 與 Proxy 它們之間的check是有一個叫 ICP (Internet caching Protocol)
  的協定 如果 hit 那就以 http 的協定傳到另一台 Proxy Server
  如果 miss 它會傳回 miss 的訊息

 squid.conf設定

 squid.conf設定檔一樣是以「#」為註解,有些設定前面有「#」,代表是預設值。也就是說除非去掉「#」並更動內容,否則squid會以預設值來啟動。由於squid.conf的設定不少,且squid.conf對每個設定都有註解,以下只針對重要的設定來作說明,而沒有提到的,通常使用預設值即可。關於squid.conf的設定範例,您可參考http://www.twnic.net/proxy/squid.conf,再配合以下講解,修改從光碟中複製的squid.conf設定檔,改成適合自己Proxy Server的設定檔。
#http_port 3128
#icp_port 3130
icp protocol是用來詢問Proxy Server有沒有它需要的資料,http protocol則是 用來取回所需的Cache資料。兩者分別需要一個埠號,與其它機器溝通。建議採預設值即可,除非有特別需求,才去更改。
Cache_host cache.tmtc.edu.tw sibling 3128 3130 proxy-only
語法:cache_host hostname type http_port icp_port option
type:最常用的當然是parent或sibling
option:此選項常用到的是proxy-only、no-query、default、round-robin
等等。
proxy-only選項說明:
Cache_host cache.tmtc.edu.tw sibling 3128 3130 proxy-only
以上的範例是設定cache.tmtc.edu.tw當我們的Proxy Server而cache.tmtc.edu.tw的http_port為3128 icp_port為3130。proxy-only表示從cache.tmtc.edu.tw Cache來的資料,不在自己的Proxy中儲存起來。除非自己Proxy Server的Cache硬碟空間很小,或者與此Proxy Server的網路連接速度很快(例如在同個區域網路中),否則通常不用proxy-only這個選項。
default選項說明:
cache_host proxy.ntu.edu.tw parent 3128 3130 default
用在parent上,繼續丟出ICP Request,重複Proxy Server之間的Cache查詢動作。
round-robin選項說明:
cache_host cacheA parent 3128 3130 round-robin no-query
cache_host cacheB parent 3128 3130 round-robin no-query
如有多個Parent Proxy Server則可使用這個選項,與選項作用相似,但是 會對Parent Proxy Server輪流送出需求。例如:這次找A Parent Proxy,下次找B Parent Proxy。
no-query選項說明:
不送ICP查詢出去,直接由http protocol取回資料。我們常將no-query配合上default、round-robin來使用。通常只有一個Parent Proxy Server的設定為default no-query,而多個Parent Proxy Server則使用round-robin no-query。
cache_host_domain proxy.ntu.edu.tw !.ntu.edu.tw
語法:Cache_host_domain cache [!]domain
說明:Proxy Server通常不去Cache自己Domain裡的資料,所以底下的設定意義為:我們的Proxy Server接到Client端的需求,而這個需求不是ntu.edu.tw Domain(台大)的資料時,才會送ICP query過去。因為即使送ICP過去詢問也是白費功夫。
cache_host_domain cache.jwindow.net .jp
設定說明:由於cache.jwindow.net有豐富的日本網頁資料。所以我們也當然可以設定,只要有「.jp」Domain的資料需求,就往cache.jwindow.net送request。
cache_host proxy.ntu.edu.tw parent 3128 3130 default
cache_host_domain proxy.ntu.edu.tw !.ntu.edu.tw
neighbor_type_domain proxy.ntu.edu.tw sibling .com
語法:neighbor_type_domain cache parent|sibling domain..
說明:可用來改變一些parent或sibling的規則,例如以下設定proxy.ntu.edu.tw為我們的parent,可替我們抓取除了.com之外的資料。就是設定了neighbor_type_domain,造成當需要www.ibm.com的資料時,只能靠自己去取回,因為此時proxy.ntu.edu.tw只能為sibling。

 acl   acl  名稱    src     ip-address/netmask  說明 : 使用src這種ACL類型,後面必須為Client端的IP-Address範圍 / 網路遮罩(或為                    CIDR格式)。請注意,「src」乃是 針對Client端的IP Address來分類,但對主機名             稱無效。所以如果想針對Client端的Domain Name來分類,則要使用            「srcdomain」。
舉例:
acl   1ocal   src   l27.0.0.1/32   140.131.41.0/255.255.255.0
→將127.0.0.l這個loop back lP與一個140.131.41.O的Class C IP器,歸為local群組。
   acl   mydomain   srcdomain   tmtc.edu.tw

 →設定所有以tmtc.edu.tw結尾的機器,皆屬於my domain的ACL群組。
      說明:我們也可以設定拒絕無reverse domain name的機器(即
                  查Domain Name。登入不完全),將這些機器歸為一類,以
                  便稍後作「進一步處理」。設定方法如下:

 acl   nodns   srcdomain   none
ad  my_url url_regex ^http://www.tmtc.edu.tw/

 →設定只要發出http://www.tmtc.edu.tw需求的Client,就屬於名myu_url的ACL群組。
    說明: 底下的設定為系統預設定義的ACL,大抵上無須更動。

 acl all src O.0.0.0/0.0.0.0

 →將所有的IP Address分類歸屬為 all。

 acl manager proto cache_object
acl SSL_ports port 443 563
acl Dangerous_ports port 7 9 19
acl CONNECT method CONNECT

 ·   針對自己所定義的ACL群組,進行權限設定:
http_access deny CONNECT ISSL_ports
→這個設定為剛才定義的CONNECT群組與「非」SSL_ports群組,都不能進行
    http_access   。請注意驚嘆號「!」,代表「除了…之外的設定值,有些狀況就很
    適合使用「!」,所以要能夠靈活運用。
http_access deny Dangerous_ports
http_access deny nodns
→拒絕nodns群組進行http_access,即reverse domain name登入不全的機器,無法使用
     我們的Proxy,進行http的object存取。
http_access allow my_url
http_access allow local
http_access allow mydomain
http_access deny all

   ☆注意:

     ACL的權限設定有First match的特性,也就是說只要連線的Client端,符合第一個
    權 限 設定,就跳開並依據遵守最先符合的權限設定。

     針對以上First match的特性,茲舉以下設定,讓讀者瞭解:
   http_access deny all
   http_access allow local
  如此一來所有的http_access均會被拒絕,並不會只允許「local」的ACL群組,進行
   http    access
  說明:當您把多項所定義的ACL群組寫在同一行的http_access
              設定時,要特別小心。因為同一行的http_access設定, ,會作AND邏輯  運
              算,所以底下的範例將無效。

       acl ME src lO.0.0.l
      acl YOU src lO.0.0.2
      http_access allow ME YOU

       因為沒有一個IP可以同時符合ME這個ACL與YOU這個ACL,所以分開寫就沒
      問題啦!如下:
      http_access allow ME
      http_access allow YOU
      因此底下的http_access設定,最好分成兩行。
      http_access allow local mydomain

 icp_access allow local
icp_access allow mydomain
icp_access deny all

 說明:底下的icp_access權限設定與http_access相同,一樣要注意「Firstmatch」,與
            設定值是否寫在同一列是否衝突等問題。不同的是icp_access用來設定,是
            否要回應別人的ICP詢問。
miss_access allow mydomain
miss_access deny !mydomain
說明:還記得要當別人的Parent,必須負起幫它取回,它所需要的資料,所以這負
            擔比較重。因此可以利用「miss_access」的權限設定,而不接受別人來亂認
           「父母」(Parent),頂多當他的鄰居(Neighbor)或姊妺(sibling),加減幫一些
            忙,以免造成系統負荷過重,嚴重影響原系統功能。底下設定只有屬於
            mydomain的ACL群組才可以認我當「父母」,獲得chlid_parent關係承認並受
            到「扶養」。
cache_host_acl proxy.ntu.edu.tw !twdn !twip
語法:cache_host_acl cache-host [!]aclname
說明:這個設定有點像'cache_host_domain,但是因為使用ACL因此更具彈性假如有
            任何 「非」台灣的URL的存取需求,我們只把這些需求送往指定位於台灣
            內的 Proxy Server,而都不急著送出台灣外去查詢,以免浪費頻寬。如要達
            到此設定的目的,便可藉由cache_host_acl來做到,舉例說明如下:

  1﹒先用 ACL 定義出哪些是台灣的URL的需求 ,如果用domain來   設定,則acl類
      型 須用「dstdomain」;如果要設定IP部份則   使用「dst」。特別注意,厎下
     「twdn」與「dst」這兩個   ACL,要各自寫成一行。筆者因為排版的關係無法
      寫成一行。

    acl twdn dstdomain tw twnic.net hinet.net acer.net
   wownet.net seeder.net silkera.net neto.net    timenet.net tw.aunef.net
   acl twip dst 140.96.0.0/11 140.128.0.0/12 140.92.0.0       139.175.0.0/16 139.223.0.0/16 163.12.0.0/14       163.16.0.0/14 168.95.0.0/16 192.72.0.0/16    192.83.160.0/19 192.83.192.0/22 192.192.0.0/16    202.39.0.0/16  202.132.128.0/17 202.145.224.0/19    203.64.0.0/12 210.64.0.0/13
2. 開始設定cache_host_acl指定Proxy Server:
    設定範例如下,意思是說如果有任何「非」台灣地區URL的需求(包括Domain
    Server形式或IP形式),就轉往proxy.ntu.edu.tw尋求協助。您可以多找幾個Cache資
    料豐富又鄰近的Proxy Server,依樣畫葫蘆。

·   接下來設定一些管理方面的參數
cache_mgr [email protected]
→設定Proxy Server管理者的E-mail,方便他人聯繫。
    語法 : cache_effective_user UserID GroupID
    說明:假如是由root啟動squid,那麼一些squid相關的Process的擁有者、擁有群組
               ,便是Cache_effeCtive_user所設定的。為了方便起見(但並非最好),們將設
                定改為Proxy管理者的UserID與GroupID:
                cache_effective_user squid squid
visible_hostname  proxy.tmte.edu.tw
→當別人使用您的Proxy Server而出現錯誤訊息時,將顯示所設定的visible_hostname
     說明 : 厎下的設定是向sd.cache.nlanr.net註冊,宣告我們也使用Squid Proxy Server
                。假 如您 不想對外宣告,那麼就把「cache_announce 24」給mark起來。
                cache_announce 24
                announce_to sd.cache.nlanr.net:3131
 dns_testname ns.tmtc.edutw ns2.tmtc.edu.tw dnS.ntu.edu.tw
→將一些較近的DNS(Domain Name Server)設定進去,越快可以得到DNS查詢回應的
   位置較前面。
說明 : 假如一天下來,log記錄檔很大,或想要細分log檔,那就把logfile_rotate設大
           一 點,請自行視情況調整。以    cache.log檔來說:設定「logfile_rotate l」,會
           把 舊的 log更名為cache.log.O儲存,而新的log則存在cache.log。
           logfile_rotate  l

 append_domain tmtc.edu.tw
→替換成您的Domain Zone即可。
       還有一些沒捉到的部份使用預設值即可,另外有些設定將還會有機會再捉
       到。現在已經把Squid.conf的設定大抵完成,可先暫告一段,繼續進行安裝
       Squid Proxy Server。
Squid基本指令說明
執行squid
cd /usr/local/squid

./squidrun.sh
停止squid
killall squid
刪除快取
cd /usr/local/squid/sbin

./squid -z
重啟squid
cd /usr/local/squid/sbin/
./squid -k parse
重新載入新設定值
cd /usr/local/squid/sbin/
./squid -k reconfigure
參考資料:
http://content.edu.tw/primary/info_edu/cy_sa/LinuxY/proxy/squidconf.htm